Adhesive vinyl is great for a variety of crafting and home decor projects. It is easy to apply and can be used on walls, windows, glass, plastic, and other materials. Here’s how to use adhesive vinyl:
- Start by cleaning the surface you want to stick the vinyl to. Make sure it is free of dust, dirt, and oils.
- Measure the size of the space you want to cover. Cut the adhesive vinyl to the desired size.
- Remove the backing paper from the adhesive vinyl. Make sure the sticky side is exposed.
- Place the adhesive vinyl onto the surface and press it down firmly.
- Use a squeegee or credit card to make sure the adhesive vinyl is firmly attached to the surface.
- Finally, peel off the transfer tape from the adhesive vinyl and enjoy your project!
What can you make with adhesive vinyl
It’s easy to use and can be applied to almost any surface. With adhesive vinyl, you can create custom decorations, signs, labels and even clothing. You can start by cutting out a design from adhesive vinyl using a craft cutter or a pair of scissors. Once your design is cut out, you can remove the backing paper and stick it onto the desired surface. You can also use a heat press to transfer the vinyl onto surfaces like fabric, wood and metal.
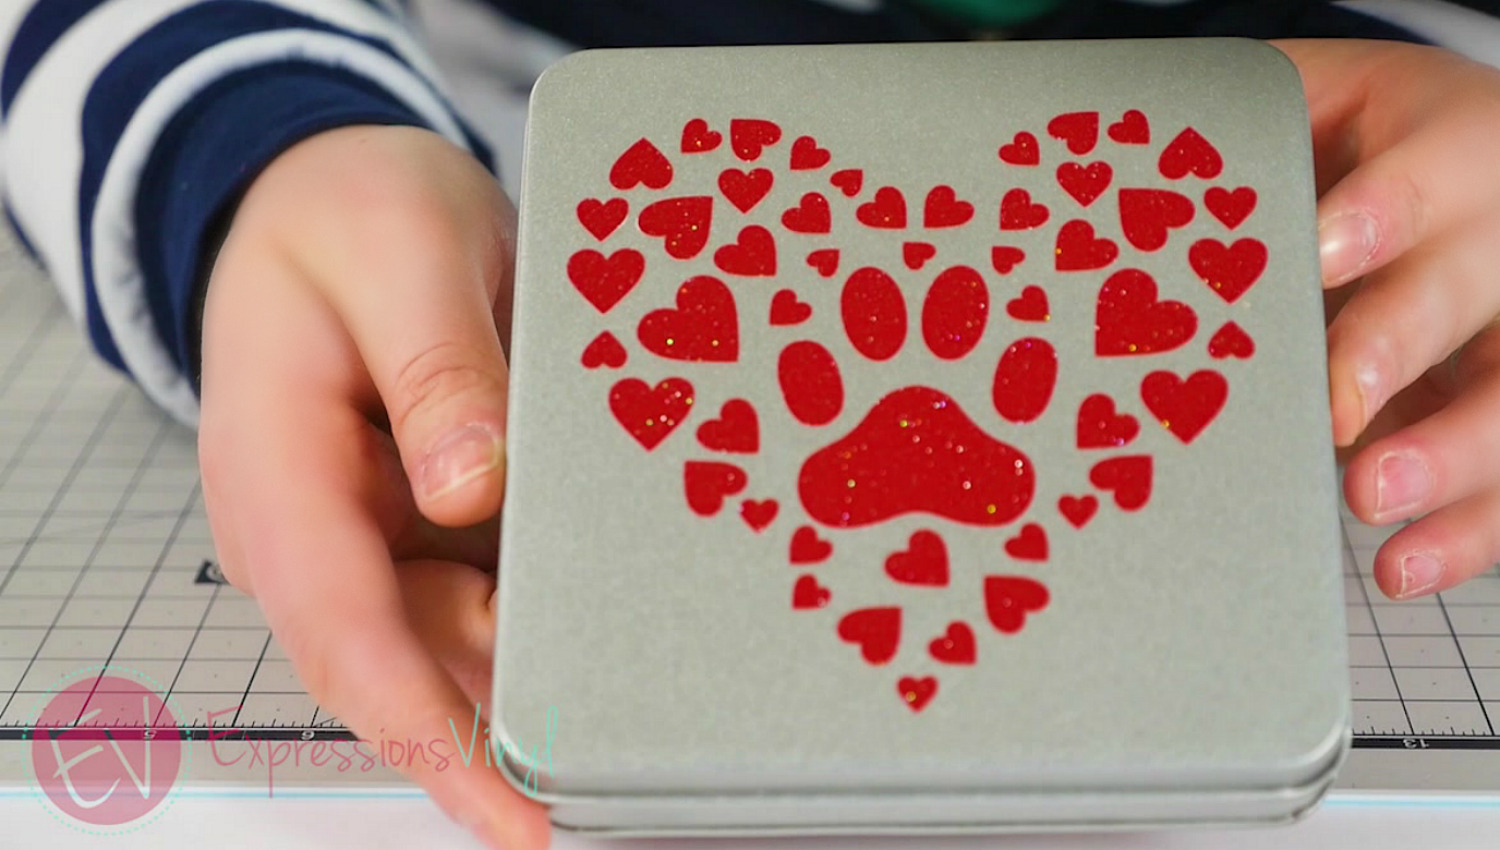
Adhesive vinyl can also be used to personalize items such as mugs, tumblers, notebooks, and even phone cases. You can create custom stickers, labels and decals to give your belongings a unique look. Adhesive vinyl can be used to create a wide range of decorations for your home. Use it to make wall decals, window decorations and even furniture covers. You can also use adhesive vinyl to make custom cards, banners, and signs for special occasions. Adhesive vinyl is a great material for any craft project. With its versatility and easy application, you can create a wide range of personalized items for yourself or for gifts. Let your creativity shine and make something unique with adhesive vinyl!
What is self-adhesive vinyl good for?
You can use adhesive vinyl to decorate walls, windows, furniture, and other surfaces. It can be used to create labels, stickers, and signs. It is also a great choice for crafting and art projects. Self-adhesive vinyl is a type of adhesive vinyl that comes with a sticky backing. This makes it very easy to apply to surfaces.
You simply need to peel off the backing, position the vinyl on the desired surface, and apply pressure. Self-adhesive vinyl is often used for indoor or outdoor signage and advertising. It is also used to make wall decals, window graphics, and car decals. It is often used for labels and stencils, as it can be easily removed and repositioned. Adhesive vinyl is a great material for any project. It is easy to use, versatile, and can be used for both indoor and outdoor applications. Self-adhesive vinyl is perfect for quick and easy projects that require little effort.
How long does adhesive vinyl last?
The longevity of adhesive vinyl will depend on the quality of the vinyl, the surface it is applied to, and what type of environment it is in. Generally, high-quality adhesive vinyl will last for up to four years and can be removed without damaging the surface. However, if it is exposed to extreme temperatures, direct sunlight, and high humidity, it may start to degrade faster. To ensure that your adhesive vinyl lasts as long as possible, make sure you are using a good quality vinyl and follow the instructions for application. Also, try to keep the vinyl out of direct sunlight or extreme temperatures.
Once the adhesive vinyl is set and sealed, it should be easy to maintain and keep looking great. Be sure to use a soft cloth and mild detergent when cleaning to avoid damaging the vinyl. Overall, adhesive vinyl can be a great way to decorate your home. With the right care, it should last up to four years. Make sure you use a good quality vinyl and follow the application instructions to get the best results.
Do you have to seal adhesive vinyl?
It can be used for both permanent and temporary decorations depending on the needs of the user. When using adhesive vinyl, one important step to consider is whether or not you need to seal it. Sealing the vinyl provides an extra layer of protection to your project from wear and tear. To determine if you need to seal adhesive vinyl, first look at the type of material you are using. If you are using an outdoor-rated vinyl, then you must seal it with a protective clear coat.
If you are using an indoor-rated vinyl, then sealing is not necessary. The sealant used for adhesive vinyl will depend on the type of material you are using. A water-based sealant is best for interior vinyl, while a UV-resistant sealant is best for exterior vinyl. You can also use a sealant spray or brush-on sealant to ensure that your adhesive vinyl will last. When applying the sealant, make sure you cover the entire surface of the adhesive vinyl so that it is completely sealed. Allow the sealant to dry completely before moving on to the next step. By sealing your adhesive vinyl, you can rest assured that it will last for years to come and will be protected from the elements.
How to make money with adhesive vinyl?
Adhesive vinyl can be used to make money in many ways.
- First, you can create designs and logos on vinyl and then sell them online or at craft fairs.
- Second, you can use adhesive vinyl to create custom decals and stickers, which you can then sell to businesses or individuals.
- Third, you can use adhesive vinyl to create signs and banners for businesses, which can be a great way to earn an income.
- Fourth, you can use adhesive vinyl to create custom apparel such as t-shirts, hats, and hoodies, which you can then sell online or at craft fairs.
- Finally, you can use adhesive vinyl to create unique pieces of artwork that you can sell for a profit.
- With a bit of creativity and hard work, you can make a lot of money with adhesive vinyl.
What type of self adhesive vinyl should I use?
When choosing the right type of vinyl, there are several factors to consider. First and foremost, you need to determine the type of material you wish to adhere the vinyl to. Different materials require different types of adhesive, so be sure to select the right vinyl for the job. The most common type of vinyl is permanent adhesive, which is great for items that won’t be moved or repositioned often, such as car decals. If you need something more versatile, then you may want to opt for removable adhesive vinyl.
This type of vinyl is perfect for items that need to be adjusted or repositioned. It’s also great for temporary projects such as seasonal displays. If you plan on using your adhesive vinyl outdoors, then you’ll need to choose a vinyl that is specifically designed to be weatherproof. Outdoor vinyl typically features a stronger adhesive, which helps to protect it from the elements. Finally, there are specialty vinyls available for a variety of different applications. For instance, there are reflective vinyls that are designed for use on vehicles, as well as special heat-transfer vinyls for apparel items. No matter what type of adhesive vinyl you choose, be sure to read the instructions carefully to ensure you’re using it properly. This will help you get the most out of your adhesive vinyl and ensure your projects turn out great.
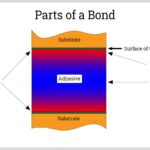
What is the best adhesive to bond vinyl to vinyl?
Using adhesive vinyl can be a great way to add a decorative touch to any craft project or create a custom look for your home. But to make sure the vinyl sticks for many years to come, you need to choose the right adhesive. When bonding vinyl to vinyl, the best adhesive to use is a vinyl adhesive. This type of adhesive is specifically designed to bond vinyl to vinyl, and it is also highly durable and waterproof. Furthermore, it can stand up to extreme temperatures and conditions, making it a great choice for outdoor projects.
Using a vinyl adhesive is simple. First, make sure the surfaces you want to bond are clean and free of dust, dirt, or grease. Then, apply the adhesive to both surfaces evenly, and press them together firmly. Allow the adhesive to set for the amount of time suggested by the manufacturer. Finally, when you are finished with the project, make sure to store the vinyl adhesive in a cool, dry place. This will help keep the adhesive from drying out and will keep it in top condition for future projects. To sum it up, when bonding vinyl to vinyl, the best adhesive to use is vinyl adhesive. This type of adhesive is designed for this specific task, and it is also highly durable and waterproof. Following the instructions outlined above will help ensure a secure bond that will last for many years.
What is the best glue for vinyl to metal?
Adhesive vinyl can be used for a variety of projects and is relatively easy to work with. It can be applied to many surfaces including metal. When applying adhesive vinyl to metal, you need to make sure you use the right glue. The best adhesive to use for vinyl to metal is a vinyl-based adhesive. This glue is designed specifically to bond vinyl to metal surfaces, making it the most reliable adhesive.
It is also water resistant, allowing you to use it both indoors and outdoors. Before applying the adhesive, you need to make sure that the metal surface is clean and free of any dirt or oil. You can use soapy water to clean the metal surface before applying the glue. Once the metal surface is clean, you can apply the adhesive. When applying the adhesive, use a brush or a foam roller to smooth out any air bubbles. This will help ensure the vinyl sticks to the metal surface. Once the adhesive is applied, you can apply the vinyl. Start by firmly pressing the vinyl onto the metal surface. Work your way around the area applying pressure until the vinyl is firmly attached. Using a vinyl-based adhesive is the best glue for vinyl to metal projects. By following the steps above, you can ensure that the adhesive bonds securely and your project is successful.
Adhesive vinyl which side down
When applying adhesive vinyl, it is important to always have the vinyl side down. This is because the adhesive sticks to the surface better when the vinyl side is facing down. Additionally, the vinyl must be applied to a smooth, clean surface for the best result. Before applying the adhesive vinyl, make sure the surface is no longer than the vinyl. Once you are sure of the size, use a ruler to measure the area and mark the edges with a pencil.
It is best to use a squeegee or a burnishing tool to press down the vinyl onto the surface, ensuring it is securely and evenly attached. After the vinyl has been applied, it is important to wait for the adhesive to set and dry. This could take anywhere from a few minutes to up to 24 hours. Once the adhesive has completely dried, you will be able to enjoy your customized surface. Adhesive vinyl is a great product to use for customizing any surface. By following these steps, you will be able to ensure the best results for your project.
Do you put shiny side down on adhesive vinyl?
When using adhesive vinyl, it is important to ensure that it is applied properly for the best results. One important step is to decide which side of the vinyl you will use. It is generally recommended that the shiny side of the vinyl should face down when you are applying it. The adhesive side is slightly tacky, so it will stick better to the surface you are applying it to. Additionally, make sure that you clean the surface where you will be applying the adhesive vinyl.
This will help to ensure that the vinyl will stick properly and will last longer. When applying the adhesive vinyl, you should also use an applicator like a squeegee or credit card to help press the vinyl into place. This will help to make sure that the vinyl adheres properly and that there are no air bubbles in the vinyl. Finally, make sure to wait at least 24 hours before handling the vinyl so that it can properly adhere to the surface. Following these steps will help ensure that your adhesive vinyl is applied correctly, and will last for the longest time possible.
Which side of permanent vinyl goes down on Cricut?
When using adhesive vinyl with Cricut, it’s important to know which side of permanent vinyl should go down. The side of the adhesive vinyl that should be facing down when cutting with a Cricut is the glossy side. This side should have a glossy or shiny finish to it. If you are unsure which side is the glossy side, you can usually tell by running your finger across it. The glossy side will feel smoother than the matte side.
When adhering the vinyl to your project, it’s important to remember that the glossy side should always be facing the substrate, or surface, that you are adhering it to. This will ensure that the adhesive vinyl sticks properly and looks great. Once you have adhered the vinyl to your project, you should use a piece of transfer paper or a scraper to transfer the vinyl onto your surface. This will ensure that the vinyl is properly and securely attached to the project. Once you have finished cutting and adhering the vinyl, you can use a clear sealer or a heat transfer to seal it, making it more durable and long-lasting. This will help ensure that the adhesive vinyl looks great for years to come.
What side goes up on permanent vinyl?
When you purchase permanent adhesive vinyl, it will come with a backing sheet that you’ll need to apply first. The backing sheet is what will keep the vinyl in place and make sure it won’t slide around. To apply the vinyl correctly, you’ll want to make sure the sticky side of the vinyl faces up when you are placing it onto the surface you want to cover. Once you have the vinyl in place, you can carefully remove the backing sheet and make sure the vinyl is firmly adhered to the surface. The permanent adhesive vinyl should stay in place for a long time, although you may want to give it an extra layer of protection with a sealant or a clear topcoat. With the right know-how and some patience, you can easily use permanent adhesive vinyl to add a personal touch to your home.
Which way do you put the vinyl?
But one important thing to keep in mind when applying adhesive vinyl is which way to put the vinyl. To get the desired effect, it is important to make sure that the vinyl is placed facing the right direction. The first step is to make sure the surface you will be applying the vinyl to is clean and dry. When you’re ready, take the piece of vinyl and hold it up to the surface you’re applying it to. Then, rotate the vinyl until it is facing the right way and the text or design is visible.
When the vinyl looks right, you can start applying it. Peel back a small part of the backing paper, and use a credit card or a squeegee to smooth out the vinyl. Once the vinyl is applied, carefully remove the rest of the backing paper. That’s all there is to it! With the right orientation and a little effort, you can easily apply adhesive vinyl to any surface.
Which side of adhesive vinyl goes down
But if you are new to using adhesive vinyl, you may be wondering which side of the vinyl goes down. The side of the adhesive vinyl that goes down depends on the type of material you are using it on. Generally, the side with the paper backing should go down on smooth, hard surfaces such as glass, metal, and plastic. This way, the adhesive sticks to the surface and the paper backing is removed easily. When using adhesive vinyl on fabric, the side with the adhesive should go down.
This way, the adhesive sticks to the fabric and the paper backing can be easily peeled off. To help you remember which side goes down, it’s helpful to know that the paper backing side has a stronger bond. The adhesive side, on the other hand, allows for easier removal. No matter which side of the adhesive vinyl is down, it is important to make sure that the surface is clean and dry before applying the vinyl. This will ensure that the vinyl sticks firmly and lasts for a long time.
Which side of the vinyl goes up on a table mat?
Adhesive vinyl can be used to make unique table mats with beautiful designs. To get the best results while using adhesive vinyl, it is important to consider which side should be facing up when applying it to the table mat. The side of the vinyl that should be placed up on the table mat is the side that is printed with the graphics. This is the side which will be visible and will be the top layer of the table mat. When properly applied, the vinyl should lay flat and adhere firmly to the table mat surface.
If the vinyl is not placed facing up, the graphics will be reversed and unreadable. If the vinyl is not properly adhered, it will not hold on the table mat and can easily be removed. To ensure that the vinyl sticks correctly to the table mat, it is best to clean the surface of the table mat first with a damp cloth. This will remove any dust, dirt, or oils that may prevent the adhesive from working correctly. After the surface is clean and dry, carefully place the vinyl onto the table mat with the printed side facing up. For best results, you can use a vinyl applicator to press the vinyl firmly onto the table mat. If you don’t have an applicator, a credit card or other flat, smooth object can also be used. Make sure to work out any air bubbles that may be trapped under the vinyl. By following these steps, you can ensure that your table mat will look great with your adhesive vinyl design.
Which side of iron vinyl should face down?
When working with iron vinyl, it is important to know which side should be facing down. To ensure that your adhesive vinyl sticks correctly, the shiny side should be facing down. This side is referred to as the backing paper and provides a smooth surface that the vinyl can stick to. This side also has a paper-like texture, which makes it easier to handle. Before applying the vinyl, make sure that the surface is clean and dry.
This will help the adhesive stick more effectively and make it last longer. Additionally, use a ruler to measure the area and draw a guideline so that the vinyl is laid out in a straight line. While applying the vinyl, make sure to press down firmly, especially around the edges. This will ensure that the adhesive sticks properly. After it is all laid out, use a scraper, such as a credit card, to press it down even more for a secure bond. Finally, remove the backing paper carefully and slowly. Make sure to pull it away from the vinyl, not the vinyl away from the paper. This will help to prevent any air bubbles or wrinkles from forming and ruining the design. By following these steps, you can easily apply iron vinyl with the backing paper facing down.
What is the dull side of vinyl?
Adhesive vinyl, or vinyl stickers, are a popular material used to decorate or customize many surfaces. However, sometimes adhesive vinyl has a dull side. This dull side is the side of the vinyl adhesive that does not have any of the colors or printed graphics. It is the backside, and the adhesive sticks to this side of the vinyl. The dull side of vinyl is important to note because when using adhesive vinyl, it is necessary to make sure it is applied with the dull side facing the surface on which it is being applied.
If you try to apply it with the printed side facing the surface, it will not adhere properly and will not last. For some projects, you may need to apply multiple layers of adhesive vinyl. When doing this, it is important to make sure that each layer of the vinyl is applied with the dull side facing the surface. This will ensure that the vinyl layers will adhere to each other properly. In short, when using adhesive vinyl, pay attention to the dull side of the vinyl and always make sure it is facing the surface. Doing so will ensure that your project looks great and lasts for a long time.
What side of vinyl decals face down?
When using adhesive vinyl, it is important to understand which side of the vinyl decal should face down. The back side of the vinyl decal is the adhesive side, and should always be facing down when applying it to the desired surface. When working with adhesive vinyl, it is essential to make sure the surface of the product you are adhering the vinyl to is clean. This involves removing dust, dirt, and any old adhesive residue from the surface. Once your desired surface is properly prepared, you can then apply the vinyl decal.
Be sure to peel back the transfer paper, and position the vinyl decal adhesive side down on the surface. Smooth out any bubbles or creases with a squeegee or other tool. Once the vinyl decal is in the correct position, carefully peel back the transfer paper. You should now have the vinyl decal adhered to the desired surface. If you need to reposition the vinyl, you can gently peel it back up and reposition it. Adhesive vinyl is a great way to personalize any project. When using adhesive vinyl, it is important to understand which side of the vinyl decal should face down for it to adhere properly. When done correctly, you should have a beautiful, personalized project!
What side of adhesive vinyl goes down on Cricut?
When it comes to using adhesive vinyl on a Cricut machine, it’s essential to know which side to put down for successful results. The adhesive side of the vinyl should always face downwards, so that it can stick to the cutting mat. This way, the machine can accurately cut through the vinyl and the material below it. To ensure that the adhesive side of the vinyl is facing downwards, you should always place the vinyl with the shiny or printed side facing up. If a vinyl sheet has a paper backing, it should be removed and the vinyl should be laid down so that the adhesive side of the vinyl is facing downwards.
It’s important to note that not all adhesive vinyls are the same. If you’re unsure, check the manufacturer’s instructions to make sure you’re using the vinyl correctly. When applying adhesive vinyl, make sure that you press it firmly onto the cutting mat or material. As the Cricut machine cuts through the material, the adhesive vinyl should stay in place. This will help ensure successful results from your project. Overall, when using adhesive vinyl with a Cricut machine, it’s important to remember to place the adhesive side of the vinyl down. This will help ensure that the machine can accurately cut through the vinyl and the underlying material.
Which side of the vinyl goes down?
To use adhesive vinyl it is important to know which side of the vinyl will go down when you apply it. The side of the vinyl that will be sticking to the surface is called the ‘face’ and the side that will be peeled off is called the ‘back’. The back of the vinyl will be the side that goes down when you apply it to your surface. Typically, the side of the vinyl with a paper backing will be the back. The paper backing will help hold the design in place and protect it until it is ready to be applied.
To check which side is the back, you can often look for some text printed on the paper backing. When you apply the vinyl, make sure you place it in the right direction. This will ensure that your design looks exactly the way you want it. If you place it in the wrong direction, your design may end up looking distorted or incorrect. Adhesive vinyl is a great way to add a custom touch to any surface. Remember to pay attention to which side is the back and make sure you place it in the correct direction when applying for best results.
Do you cut adhesive vinyl shiny side up?
When using adhesive vinyl, the most important step is to make sure that you cut it correctly. The “shiny side” of adhesive vinyl is actually the adhesive side, so when cutting it, you should cut the shiny side up. This will help ensure that your design will stick properly to your project surface. To cut adhesive vinyl, you will need a pair of scissors or a craft knife and a cutting mat. Make sure to measure and mark your design before cutting, so you have a guide to follow.
When cutting, use a slow and steady motion, as this will give you the best results. Once you have finished cutting your adhesive vinyl, it’s time to apply it to your project. Make sure to choose the right type of adhesive for your project, as there are a variety of options available. Once your adhesive is ready, carefully peel the backing away from the vinyl, exposing the adhesive side. Then, firmly press the adhesive vinyl onto the project surface, making sure to press out any air bubbles. Cutting adhesive vinyl can be a little tricky, but with the correct tools and techniques, you can create great results. Just remember to always cut the shiny side up, and you’ll be on your way to making your project look great.
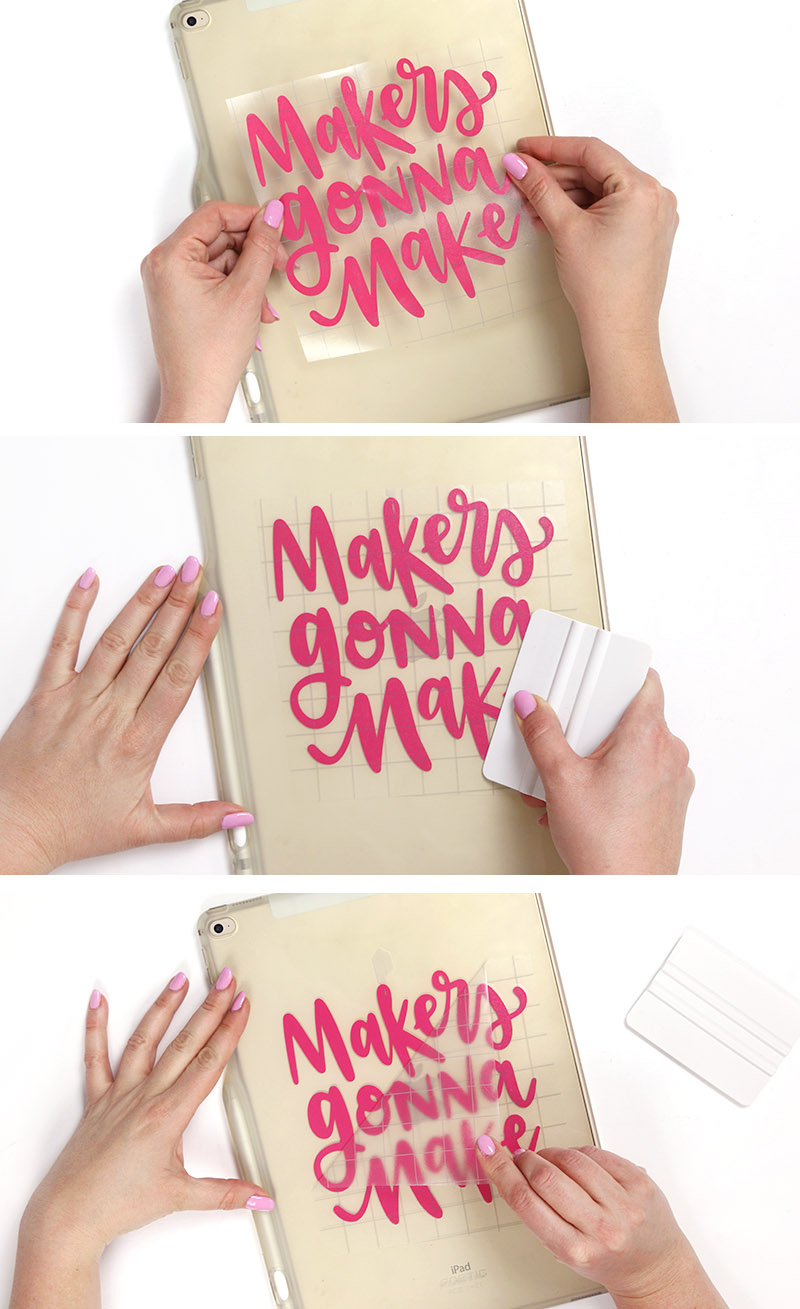
How do you apply adhesive vinyl?
To apply adhesive vinyl, you need to start off by preparing the area you want to decorate. Make sure the surface is clean and free of any dust, dirt, or other debris. Next, you will want to measure and cut out the vinyl and place it onto the surface. Once it is in place, use a squeegee or credit card to firmly press the vinyl down and get rid of any air bubbles. You may need to work over the area a few times to make sure the vinyl is firmly attached.
Once you have finished applying the vinyl, you can then use a heat gun or hair dryer to activate the adhesive and help it better adhere to the surface. Make sure to move the heat gun in a circular motion and keep the nozzle a few inches away from the vinyl. Finally, you can then remove the transfer tape from the vinyl and admire your work. Adhesive vinyl is a great way to add a unique touch to any surface and have it last for years to come.
How to cut permanent adhesive vinyl on cricut
To get the best results, it’s important to know how to cut permanent adhesive vinyl on a Cricut. First, you need to connect your Cricut to your computer. Load the permanent adhesive vinyl into the cutting mat, making sure that it is firmly pressed against the mat. Now you need to select the size and shape of the design that you want to cut. Select the type of vinyl that you are using and confirm the settings in the Cricut software.
Once you have confirmed the settings, press the “Go” button on your Cricut machine. The machine will then start cutting your design. Depending on the complexity of the design, the cutting process can take several minutes. When the machine finishes cutting, remove the vinyl from the cutting mat. You can now start applying the vinyl to your chosen surface. Make sure that the surface is clean and dry before applying the vinyl. Carefully apply the vinyl to the surface and use a hard applicator tool to press it down firmly. Once the vinyl is firmly attached to the surface, you can remove the backing paper. The vinyl is now in place and ready for you to enjoy. With a little practice, you will be able to cut permanent adhesive vinyl on a Cricut with ease. Have fun creating unique and personalised projects with permanent adhesive vinyl!
Which side of adhesive vinyl goes down?
It’s important to know which side of the adhesive vinyl goes down when applying it. The adhesive side of the vinyl is usually the smoother side, and it should be placed against the surface that you want to stick it to. If the adhesive side is not facing down, the vinyl won’t stick properly and may even start to peel off. When using adhesive vinyl, make sure to securely press it against the surface to ensure good adhesion. If you’re applying it to something curved or with a lot of texture, it can help to use a tool or soft cloth to spread the vinyl evenly across the surface.
You should also avoid exposing adhesive vinyl to too much heat, as this may cause it to warp or stretch. For best results, store it in a cool, dry place when not in use. Using adhesive vinyl is a great way to customize your home or other projects. With the right techniques and patience, you’ll be able to create a unique look that will last. Just remember, the adhesive side should always go down when applying it and take your time to get the best results.
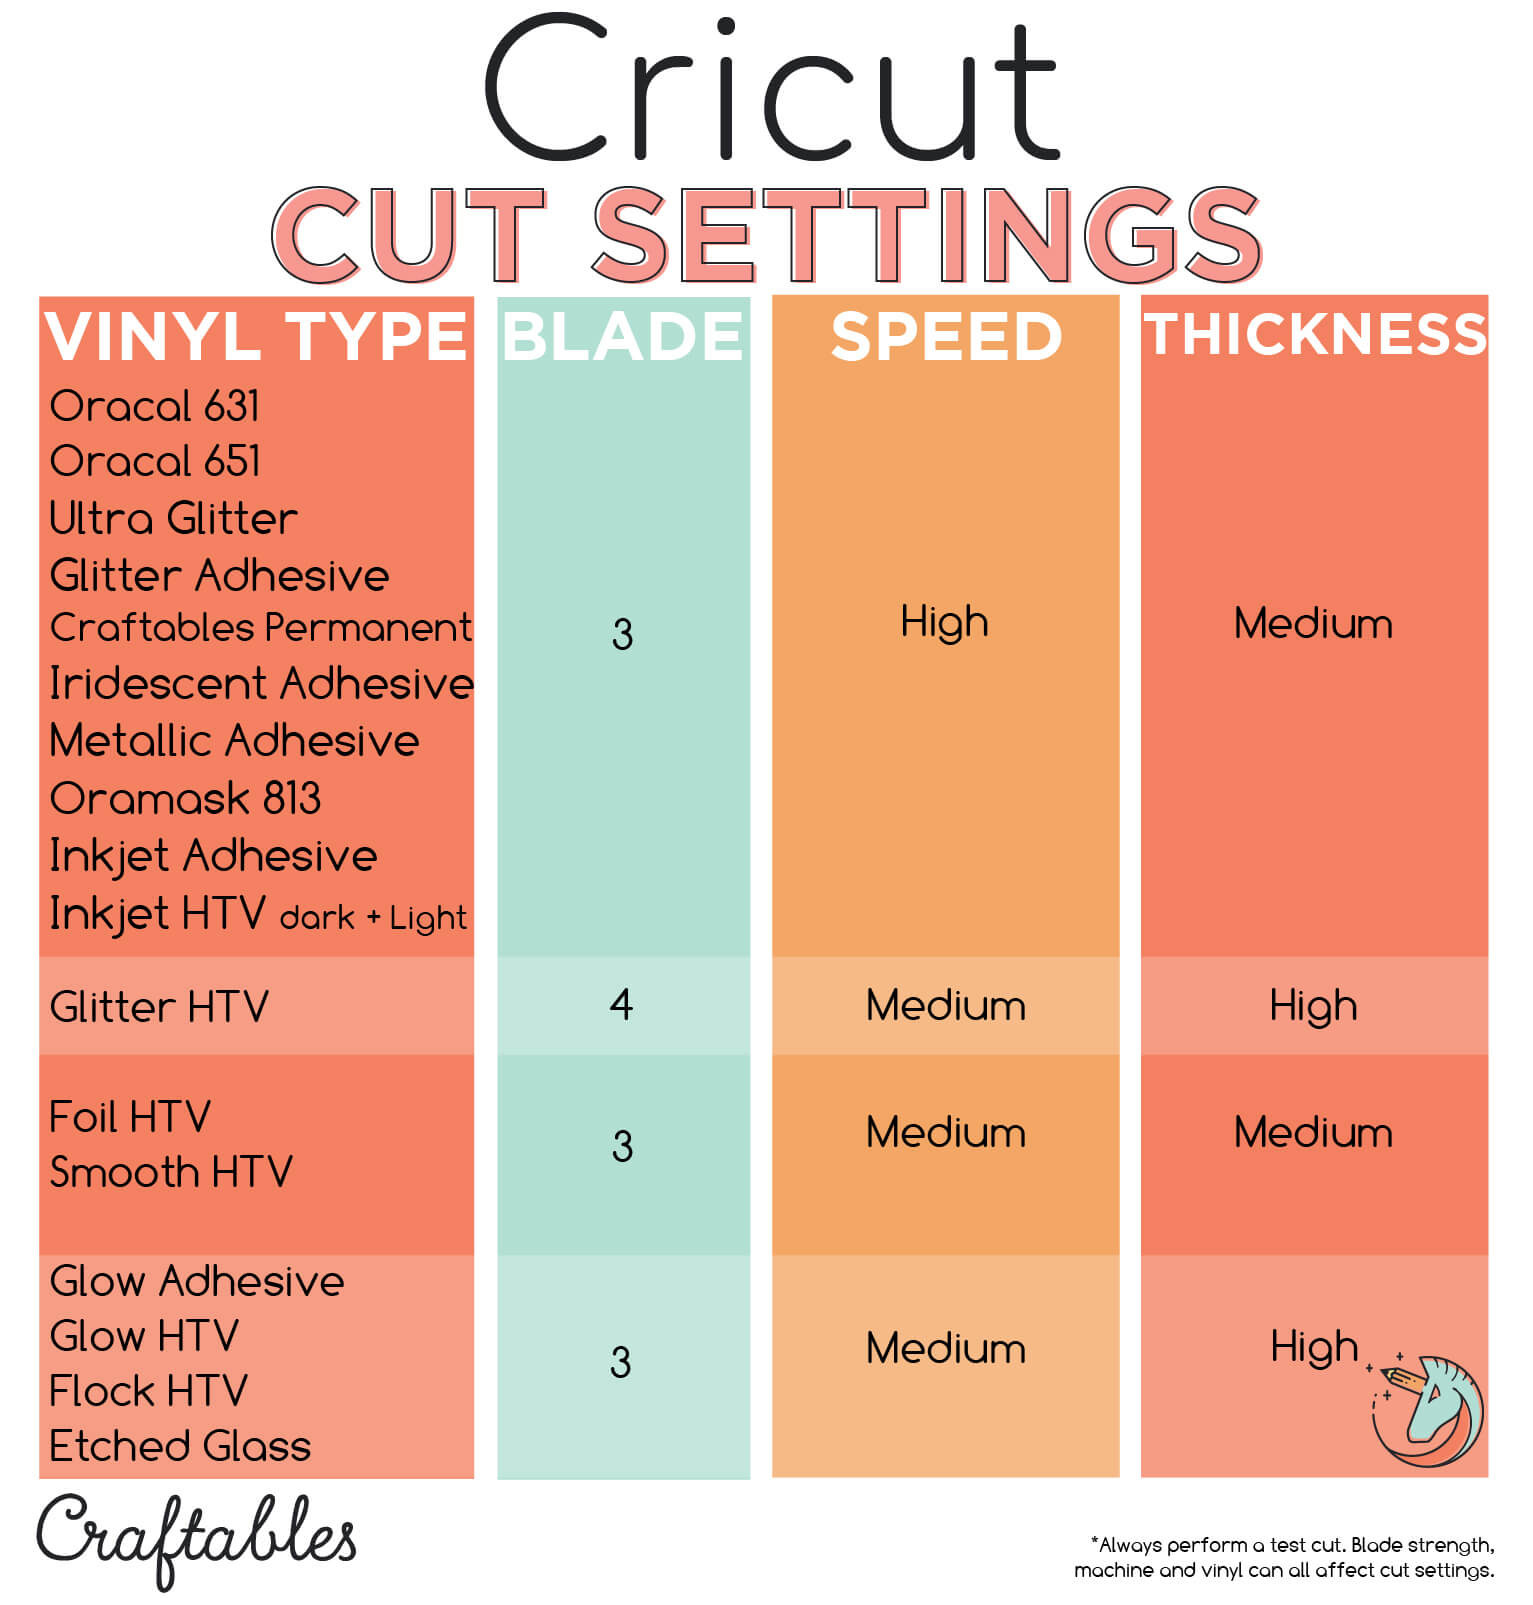
What blade do you use to cut permanent vinyl?
Using adhesive vinyl to create home decor or signage can be a simple and cost-effective way to customize your space. To ensure proper cutting, you’ll need the right blade. For permanent vinyl, you’ll want to use a 45° blade. This blade is specifically designed to cut through the thick material. It also allows for greater precision in your cuts.
When using a 45° blade, be sure to set your cutting machine to a deeper blade setting. This will help ensure the blade is able to cut through the full thickness of the material. The 45° blade can also be used to create intricate designs with permanent vinyl. The sharp angle will help make sure you get clean edges, while the deeper blade setting will help ensure that you don’t make any mistakes in your cutting. For best results, use a light pressure when cutting. This will help ensure that you don’t damage the material or accidentally tear it. After cutting, you may need to use a detail blade to get rid of any rough edges. In summary, a 45° blade is the best choice for cutting permanent vinyl. Be sure to set your machine to the correct blade setting and use a light pressure to get the best results. With the right tools and a little bit of patience, you’ll be able to create beautiful vinyl projects with ease.
How do you cut self adhesive vinyl?
Self-adhesive vinyl is especially popular, as it can be easily cut to whatever shape and size you need. To cut self-adhesive vinyl, you need to have the right tools and materials. The most important tool you need is a pair of scissors or a craft knife. The latter is preferred, as it gives you more precision and control when cutting the vinyl. You will also need a flat surface to work on and a ruler or straight edge to make sure your cuts are precise and straight.
Once you have all the necessary tools, you can start cutting the self-adhesive vinyl. Place your vinyl down on the flat surface, and use the ruler or straight edge to guide your craft knife. When cutting, make sure to go slowly and apply even pressure throughout the entire cut. This will help to ensure a smooth, clean cut. Once you have finished cutting, use a piece of masking tape to secure the top and bottom edges of the self-adhesive vinyl. This will help to keep the vinyl from coming apart as you transfer it to its final surface. After this is done, you can peel off the backing and press the vinyl onto the desired surface. By following these steps, you should be able to easily cut self-adhesive vinyl and get great results. With a bit of practice, you can get creative with your designs and make beautiful home décor pieces with adhesive vinyl.
How many tooth blades do I need for vinyl?
To use it, you will need tooth blades to cut your vinyl. The number of blades you will need will depend on the specific project you have in mind. For large projects, such as wall murals, you will likely need several blades. Start with one and see how it works for your project, then add more if needed. For smaller projects, such as home decor items, one blade will usually suffice.
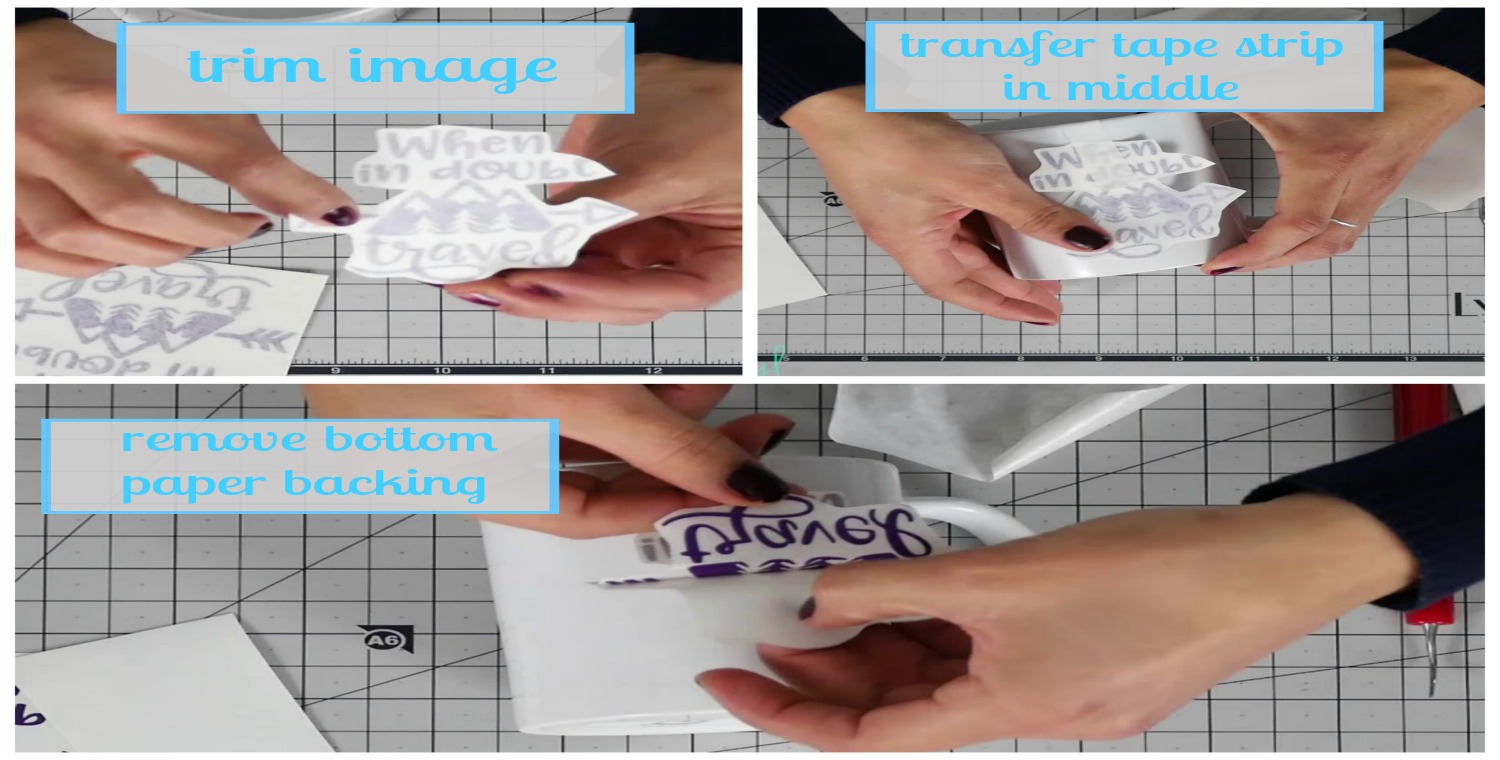
The most important thing is to make sure that your blades are sharp and in good condition. Dull blades make it difficult to get a clean, smooth cut, and may lead to frustration. When in doubt, it’s better to err on the side of caution and use more blades to ensure a good result. In addition to the blades, you will also need an adhesive transfer tape to secure your vinyl in its final location. It’s important to find a tape that is compatible with the type of vinyl you are using. Once you have your blades and transfer tape, you are ready to start applying your adhesive vinyl.
When cutting permanent vinyl is it shiny side down?
When cutting permanent vinyl, it is important to remember that the shiny side of the vinyl should be facing downwards. This helps ensure that when you apply the adhesive vinyl it will stick to the desired surface properly. When cutting permanent vinyl, the blade should always be facing away from you, as it can be dangerous otherwise. Always use a ruler to make sure your lines are straight and use a cutting mat to protect your work surface from damage. The permanent vinyl is then placed onto the cutting mat with the shiny side down, and the image can be marked using a pen or marker.
The vinyl should then be cut out using a craft knife or cutting machine. Once the adhesive vinyl is cut, you can use an adhesive transfer tape to transfer the vinyl onto the desired surface. Carefully place the adhesive vinyl onto the surface and press down firmly. This will help ensure the vinyl is properly stuck. When cutting permanent vinyl, it is essential to ensure the shiny side is facing downwards and that the blade is facing away from you. This will help ensure you get the best results when using adhesive vinyl.
Do you mirror permanent vinyl when cutting?
To ensure successful application of the vinyl, it’s important to understand how to cut and use it. When cutting adhesive vinyl, the vinyl should be mirrored when placing the design onto the cutter. This means that you have to reverse the design before you cut. This is necessary so that when you apply the vinyl it will be in the correct orientation. When cutting permanent vinyl, it is not necessary to mirror the design.
Permanent vinyl is designed to last longer and be more durable than other types of adhesive vinyl. It has a thicker layer of adhesive backing and does not require the design to be reversed prior to cutting. No matter what type of adhesive vinyl you’re using, it’s important to make sure the cut lines are precise and accurate. This will ensure that the vinyl adheres to the surface smoothly without any bumps or creases. Adhesive vinyl is a great way to add a personalized touch to any item, but it’s important to make sure you understand how to use it properly. Always remember to mirror your design when cutting adhesive vinyl, unless you are using permanent vinyl.
Why is my vinyl peeling up while cutting?
One issue many people run into when using adhesive vinyl is that the vinyl can start to peel up while cutting. This issue is typically caused by a lack of a good grip between the vinyl and the cutting mat. To avoid this, it is important to have a clean surface and use a good quality cutting mat. The cutting mat should have a sticky surface, which will help the vinyl to adhere better and resist peeling up. Another effective way to prevent the vinyl from peeling while cutting is to use a low-tack transfer paper.
This transfer paper acts as a bridge between the vinyl and cutting mat, helping to keep the vinyl in place while cutting. Also, make sure the vinyl is firmly pressed onto the cutting mat before beginning to cut. If it’s not well adhered, it could cause the vinyl to move and cause it to peel up. Finally, be sure to use a sharp blade for cutting the vinyl. If the blade is dull, it could cause the vinyl to tear, resulting in peeling. If you use a sharp blade and follow the above steps, your vinyl should stay in place while cutting.
Why is my Cricut not cutting through permanent vinyl?
If you’re having trouble getting your Cricut to cut through permanent vinyl, there are a few steps you can take. First, make sure the cutting mat is properly secured and isn’t warped. If it is, replace it with a new one. Next, make sure the blade is sharp and up to date. If it is dull, replace it.
The cutting speed and pressure should also be set correctly. Also, check the vinyl itself. Make sure it is the right type of permanent vinyl and that it is placed properly onto the cutting mat. If all these steps don’t help, you may need to clean the cutting mat with rubbing alcohol. This will remove any debris or residue from previous projects that could be hindering the machine’s ability to cut. Finally, make sure to use the correct setting for the type of vinyl you are using. The cutting depth, speed, and pressure can all have an effect on the performance of your Cricut. If these settings are not correct, it may prevent the Cricut from cutting through your permanent vinyl.
Is Cricut permanent vinyl actually permanent?
The good news is that Cricut permanent vinyl is designed to last for years, even when exposed to extreme conditions such as heat, water and sun. The vinyl has a strong adhesive, which helps it to stick to many surfaces and remain in place, even through inclement weather. In addition to its impressive durability, Cricut permanent vinyl is also fairly easy to use and offers a range of colors and finishes. The vinyl can be applied to most smooth surfaces including walls, windows, and furniture, and can even be removed and repositioned if needed. Overall, Cricut permanent vinyl is a great option for crafting projects that require a long-lasting finish. The vinyl is reliable, easy to use, and provides a great range of colors and finishes for crafters to choose from. Whether you’re looking for a durable vinyl for a project or simply want to create some personalized decorations, Cricut permanent vinyl is an excellent choice.
Why is my vinyl coming off when cutting?
Using adhesive vinyl can be a great way to add a personal touch to any project. But sometimes you can run into issues with the vinyl coming off the surface when it’s being cut. The most common reason for this is not using enough pressure when cutting. You should always apply enough pressure to ensure that the vinyl is fully adhered to the cutting mat. If pressure is not applied, the vinyl will tend to come off as it is being cut.
Another reason why your vinyl might be coming off while cutting is if the adhesive is too weak. To ensure that your vinyl has proper adhesion, you’ll want to make sure you use a high-quality adhesive vinyl. It’s also important to make sure that your blade is sharp and clean before cutting. A dull or dirty blade can cause the vinyl to pull away from the surface as it is being cut. If you’re still having issues with your vinyl coming off when cutting, you can try replacing the cutting mat or applying a transfer tape to the vinyl before cutting. These methods can help ensure that the vinyl stays firmly in place while it is being cut.